Spooky Baked Halloween Chips- Easy & Fun Recipe
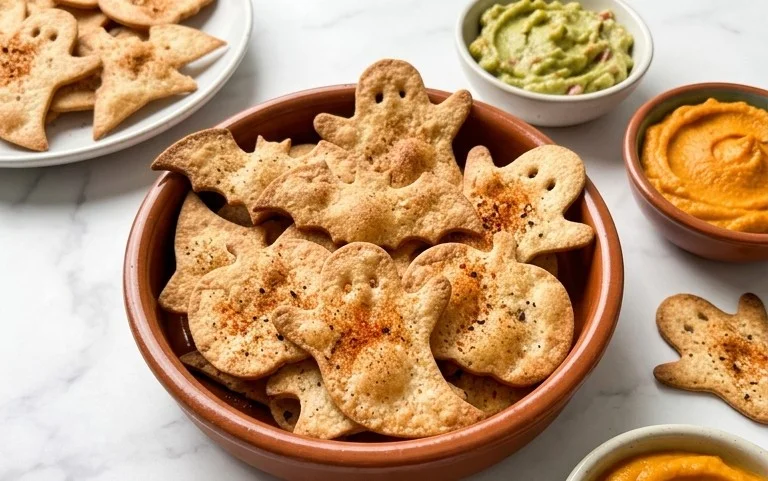
Spooky Baked Halloween Chips are about to become your new favorite frightful feast! As the crisp autumn air settles and the jack-o’-lanterns begin to grin, there’s nothing quite like gathering around for some delicious and delightfully eerie treats. We all know and love the satisfying crunch of a perfectly baked chip, but imagine taking that beloved snack and transforming it into a haunted masterpiece. That’s exactly what we’re doing here! These spooky baked Halloween chips aren’t just a treat for your taste buds; they’re a visual spectacle designed to delight ghouls and goblins of all ages. What makes this recipe so special? It’s the perfect blend of simplicity and spooktacular creativity. You get all the amazing flavor and crunch you crave, with a fun, festive twist that’s guaranteed to be the star of your Halloween party or cozy movie night.
Spooky Baked Halloween Chips
Get ready to add a delightfully eerie touch to your Halloween festivities with these Spooky Baked Halloween Chips! Forget the store-bought bags; these homemade treats are not only fun to make but also incredibly delicious. They’re crispy, customizable, and perfect for dipping or as a spooky snack on their own. We’ll be using simple ingredients and a touch of Halloween magic to transform ordinary tortillas into festive shapes that are sure to impress your ghoulish guests. This recipe is so straightforward, even the little monsters in your family can help out with the cutting and baking. Let’s get started on creating some hauntingly good chips!
Ingredients:
- 4 flour tortillas (gluten-free or grain-free, as needed)
- Spray avocado or olive oil
- Salt
- Halloween cookie cutter (ghosts, bats, pumpkins, or any spooky shape you fancy!)
Instructions:
-
Prepping Your Workspace and Oven
The first step in conjuring up these spooky delights is to get your kitchen ready for some Halloween magic. Preheat your oven to 375 degrees Fahrenheit (190 degrees Celsius). This temperature is perfect for achieving a wonderfully crisp chip without burning them. While the oven is heating up, take out a large baking sheet. If you want to make cleanup even easier, you can line the baking sheet with parchment paper or a silicone baking mat. This prevents any sticking and ensures your ghostly shapes come off the tray cleanly. Also, clear a flat surface on your counter or a large cutting board where you’ll be doing your cutting. Having everything prepared beforehand will make the process smooth and enjoyable.
-
Transforming Tortillas into Spooky Shapes
Now for the fun part: the shaping! Take one flour tortilla and lay it flat on your prepared surface. Lightly mist one side of the tortilla with your avocado or olive oil spray. You don’t need to drench it; a light, even coating is all that’s required. Then, sprinkle a generous but not overwhelming amount of salt over the oiled side. This is where your Halloween cookie cutters come into play. Press your chosen cookie cutter firmly into the salted tortilla, cutting out as many shapes as you can from a single tortilla. As you cut out a shape, carefully lift it and place it onto your prepared baking sheet. Try to arrange the cut-out shapes so they are not touching each other too much on the baking sheet. This allows for better air circulation, which is key to getting them nice and crispy. Once you’ve cut out as many shapes as possible from the first tortilla, repeat the process with the remaining tortillas. You’ll be amazed at how many spooky figures you can create! Don’t worry about the scraps left over; they make for delicious, albeit irregularly shaped, chips.
-
Baking for the Perfect Crisp
With all your spooky shapes adorning the baking sheet, it’s time to bake them to crispy perfection. Carefully place the baking sheet into your preheated oven. The baking time will vary slightly depending on your oven and the thickness of your tortillas, but generally, you’ll want to bake them for about 8 to 12 minutes. Keep a close eye on them, especially during the last few minutes. You’re looking for them to turn a lovely golden brown around the edges and feel firm to the touch. If you notice some chips are baking faster than others, you can carefully remove the done ones from the baking sheet and let the remaining ones continue to bake for a short while longer. This ensures an even crispness across all your spooky creations. The aroma of toasting tortillas will fill your kitchen, signaling that your Halloween treats are almost ready!
-
Cooling and Revealing Your Eerie Delights
Once your spooky baked chips have reached that perfect golden-brown crispness, carefully remove the baking sheet from the oven. The chips will be quite hot at this stage, so exercise caution. Transfer the chips from the hot baking sheet to a wire cooling rack. This is a crucial step for achieving maximum crispiness. Allowing them to cool on a wire rack lets air circulate all around them, preventing any moisture from getting trapped and making them soggy. As they cool, they will continue to crisp up even further. You might hear little crackles and pops as they settle – that’s the sound of perfectly baked chips! While they are cooling, you can start thinking about what delicious dips you’ll serve them with. This cooling period is also a good time to tidy up your workspace and wash your cookie cutters.
-
Serving Your Hauntingly Good Creations
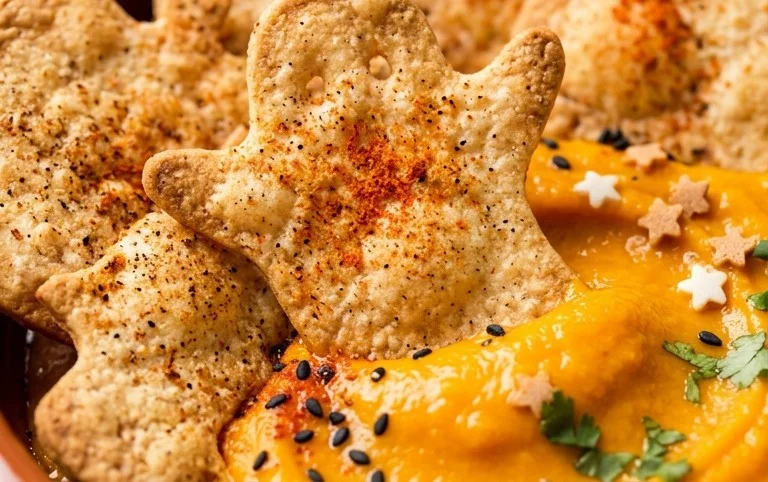
After your Spooky Baked Halloween Chips have cooled completely on the wire rack, they are ready to be devoured! Arrange them on a festive platter or in a bowl. They are fantastic on their own, offering a satisfying crunch with a hint of salt. For an extra layer of Halloween fun, consider serving them with a variety of dips. A creamy guacamole can be your “swamp dip,” salsa can be a “bloody” good accompaniment, or a cheesy queso can be your “pumpkin patch” dip. You can even get creative with the presentation of your dips to match the spooky theme. These chips are a crowd-pleaser for all ages, from little goblins to grown-up ghouls. Enjoy the satisfaction of having made these homemade Halloween treats that are as fun to look at as they are to eat! They are best enjoyed within a day or two of baking to maintain their optimal crispness.
Conclusion:
There you have it! These Spooky Baked Halloween Chips are an absolute winner for any Halloween gathering or even just a fun weeknight treat. What makes them so great? They’re incredibly easy to whip up, satisfyingly crunchy, and endlessly customizable. Plus, the baked method means you can feel a little better about indulging compared to their fried counterparts. I love how versatile they are – you can tailor the flavors to your heart’s content, making them perfect for both picky eaters and adventurous palates. They’re the ideal centerpiece for any Halloween spread, offering a festive and delicious crunch that everyone will adore.
For serving, these chips are fantastic on their own, but they truly shine when paired with your favorite dips. Think a creamy guacamole, a zesty salsa, or even a spooky black bean dip. They’re also brilliant as a side for chili or loaded up as nachos for a more substantial snack. Don’t be afraid to get creative with your presentations too – arrange them in fun shapes or serve them in mini cauldrons!
Don’t forget to explore the variations mentioned! Adding different spices like smoked paprika, garlic powder, or even a touch of cayenne pepper can transform these chips into something entirely new. For a sweet and savory twist, try a sprinkle of cinnamon and a drizzle of maple syrup (though that might lean away from “spooky” and more towards “deliciously autumnal”). I truly encourage you to give these Spooky Baked Halloween Chips a try this season. You’ll be amazed at how simple it is to create such a memorable and tasty treat.
Frequently Asked Questions:
Can I use different types of vegetables for these chips?
Absolutely! While potatoes are a classic, you can experiment with sweet potatoes, zucchini, or even parsnips. Just ensure you slice them thinly and evenly for consistent baking. Keep in mind that cooking times may vary slightly depending on the vegetable.
How can I make these chips extra crispy?
For maximum crispiness, make sure your vegetable slices are as dry as possible before tossing them with oil and seasonings. Spreading them in a single layer on the baking sheet is also crucial. If they’re overcrowded, they’ll steam rather than bake and won’t get as crisp.
What’s the best way to store leftover chips?
Once completely cooled, store any leftover Spooky Baked Halloween Chips in an airtight container at room temperature. They are best enjoyed within a couple of days to maintain their optimal crunchiness.
Spooky Baked Halloween Chips
Crispy, savory baked tortilla chips cut into fun Halloween shapes, perfect for your spooky party.
Ingredients
-
4 flour tortillas (gluten-free or grain-free, as needed)
-
Spray avocado oil
-
Salt
-
1 teaspoon garlic powder
-
1/2 teaspoon paprika
-
1/4 teaspoon onion powder
Instructions
-
Step 1
Preheat your oven to 375°F (190°C). -
Step 2
Lightly spray both sides of each flour tortilla with avocado oil. -
Step 3
Sprinkle both sides of the tortillas with salt, garlic powder, paprika, and onion powder. -
Step 4
Using Halloween cookie cutters, cut out desired shapes from the tortillas. -
Step 5
Arrange the cut-out shapes in a single layer on a baking sheet. -
Step 6
Bake for 8 minutes, or until golden brown and crispy, flipping halfway through if needed. -
Step 7
Let cool slightly before serving.
Important Information
Nutrition Facts (Per Serving)
It is important to consider this information as approximate and not to use it as definitive health advice.
Allergy Information
Please check ingredients for potential allergens and consult a health professional if in doubt.
